Japanese Alley 3D Game Environment Creation
Japanese Alley 3D Game Environment Creation, available at $59.99, has an average rating of 4.4, with 95 lectures, based on 96 reviews, and has 984 subscribers.
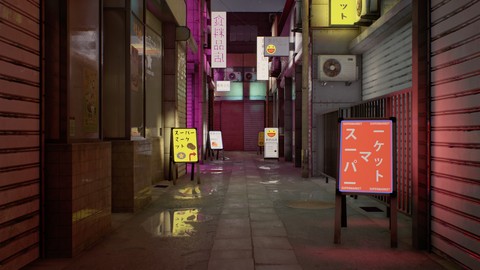
You will learn about Create an amazing complete game-ready 3D environment Bake clean maps Create realistic wet ground Produce believable dirt, scratches and grime Learn how to make moist-rain effects on window glass and buildings Create professional UV maps Create realistic glow materials Understand proper scale for creating environments High poly to low poly baked workflow Use weighted vertex normals efficiently This course is ideal for individuals who are Anyone who wants to know how to create a game environment It is particularly useful for Anyone who wants to know how to create a game environment.
Enroll now: Japanese Alley 3D Game Environment Creation
Summary
Title: Japanese Alley 3D Game Environment Creation
Price: $59.99
Average Rating: 4.4
Number of Lectures: 95
Number of Published Lectures: 95
Number of Curriculum Items: 95
Number of Published Curriculum Objects: 95
Original Price: $59.99
Quality Status: approved
Status: Live
What You Will Learn
- Create an amazing complete game-ready 3D environment
- Bake clean maps
- Create realistic wet ground
- Produce believable dirt, scratches and grime
- Learn how to make moist-rain effects on window glass and buildings
- Create professional UV maps
- Create realistic glow materials
- Understand proper scale for creating environments
- High poly to low poly baked workflow
- Use weighted vertex normals efficiently
Who Should Attend
- Anyone who wants to know how to create a game environment
Target Audiences
- Anyone who wants to know how to create a game environment
Instructor Info
Emiel Sleegers always had love for video games and when he was young, he started using Unity3D for programming but he found himself gravitating more towards the art of making games. Now he is currently working as an environment artist in Ubisoft. He contributed to creating AAA games such as Forza Horizon 3 and The Division 2. His all time favorite game is The Last of Us and that video game is what inspired him to want to work in the game industry. His advice for beginner artists is to focus on one aspect of gaming that they are passionate about, stick to it and get better at it. His hobbies include anything related to games or films, whether it be working on personal projects, freelance work or going out for movies.�
Course Info�
In this course, we will go over the entire process of how to create a Japanese Alley game environment. We will first start out with a blockout of the scene to achieve a proper sense of scale, and once that is done, we will go back to the blockout to 3d modeling the buildings. We will do a high poly to low poly workflow where we will create a high res and low res model and bake normal maps for them. We will go through the process of how to make the environment look realistic, how to use weighted vertex normals, and how to do smart, quick and clean unwrapping of uvs. Then we will jump into Substance Designer to create tilable textures such as metal, concrete, and tarmac. We will touch up on Substance Painter and little bit of Photoshop to texture our props. Once everything is modeled and textured, we will import everything in Unreal to setup our materials and lighting for a nice final render.
Course Curriculum
Chapter 1: Introduction
Lecture 1: Introduction
Chapter 2: Blockout, Modeling, Preparing Textures
Lecture 1: Going Over Reference
Lecture 2: Creating the Blockout Part 1
Lecture 3: Creating the Blockout Part 2
Lecture 4: Creating the Blockout Part 3
Lecture 5: Creating the Blockout Part 4
Lecture 6: Setting up Blockout in Unreal Part 1
Lecture 7: Setting up Blockout in Unreal Part 2
Lecture 8: Creating the Buildings Part 1
Lecture 9: Creating the Buildings Part 2
Lecture 10: Creating the Buildings Part 3
Lecture 11: Creating the Buildings Part 4
Lecture 12: Creating the Buildings Part 5
Lecture 13: Creating the Buildings Part 6
Lecture 14: Creating the Buildings Part 7
Lecture 15: Creating the Buildings Part 8
Lecture 16: Creating the Buildings Part 9
Lecture 17: Finish Creating the Buildings
Lecture 18: Creating the Tarmac Texture Part 1
Lecture 19: Creating the Tarmac Texture Part 2
Lecture 20: Creating the Tarmac Texture Part 3
Lecture 21: Creating the Tarmac Texture Part 4
Lecture 22: Creating the Tarmac Texture Part 5
Lecture 23: Creating the Rollup Door Texture Part 1
Lecture 24: Creating the Rollup Door Texture Part 2
Lecture 25: Creating the Rollup Door Texture Part 3
Lecture 26: Finish Creating Rollup Door Texture
Lecture 27: Creating the Metal Panels Part 1
Lecture 28: Creating the Metal Panels Part 2
Lecture 29: Creating the Stone Tiles Part 1
Lecture 30: Creating the Stone Tiles Part 2
Chapter 3: Unwrapping, Texturing, and Game Engine Setup
Lecture 1: Creating the Aircon Unit Part 1
Lecture 2: Creating the Aircon Unit Part 2
Lecture 3: Creating the Aircon Unit Part 3
Lecture 4: Unwrapping Our Aircon Unit
Lecture 5: Baking our Aircon Unit Part 1
Lecture 6: Baking our Aircon Unit Part 2
Lecture 7: Texturing the Aircon Unit Part 1
Lecture 8: Texturing the Aircon Unit Part 2
Lecture 9: Creating the Neon Signs Part 1
Lecture 10: Creating the Neon Signs Part 2
Lecture 11: Creating the Neon Signs Part 3
Lecture 12: Creating the Neon Signs Part 4
Lecture 13: Finish Creating the Neon Signs
Lecture 14: Creating the Utility Pole Part 1
Lecture 15: Creating the Utility Pole Part 2
Lecture 16: Creating the Utility Pole Part 3
Lecture 17: Creating the Rollup Door Part 1
Lecture 18: Creating the Rollup Door Part 2
Lecture 19: Creating the Rollup Door Part 3
Lecture 20: Creating the Painted Metal Texture
Lecture 21: Unwrapping Our Scene
Lecture 22: Unwrapping the Windows
Lecture 23: Unwrapping the Windows Part 2
Lecture 24: Unwrapping the Windows Part 3
Lecture 25: Adding the Utility Poles and Wires Part 1
Lecture 26: Adding the Utility Poles and Wires Part 2
Lecture 27: Creating Any Fencing
Lecture 28: Exporting our Objects
Lecture 29: Placing all Final Rollup Doors Part 1
Lecture 30: Placing all Final Rollup Doors Part 2
Lecture 31: Importing our Assets and Setting Up Materials Part1
Lecture 32: Importing our Assets and Setting Up Materials Part 2
Lecture 33: Placing our Neon Lights Part 1
Lecture 34: Placing our Neon Lights Part 2
Lecture 35: Balancing the Lights and Textures Part 1
Lecture 36: Balancing the Lights and Textures Part 2
Lecture 37: Setting Up Post Processing Part 1
Lecture 38: Setting Up Post Processing Part 2
Lecture 39: Balancing our Scene
Lecture 40: Creating our Window Textures
Lecture 41: Adding Wetness to our Materials
Lecture 42: Placing our Final Props Part 1
Lecture 43: Placing our Final Props Part 2
Chapter 4: Polishing the Environment
Lecture 1: Polishing the Lighting
Lecture 2: Improving our Tarmac Texture Part 1
Lecture 3: Improving our Tarmac Texture Part 2
Lecture 4: Improving our Tarmac Texture Part 3
Lecture 5: Improving our Tarmac Texture Part 4
Lecture 6: Improving our Tarmac Texture Part 5
Lecture 7: Improving our Tarmac Texture Part 5.2
Lecture 8: Improving our Tarmac Texture Part 6
Lecture 9: Improving our Tarmac Texture Part 6.2
Lecture 10: Improving our Tarmac Texture Part 7
Lecture 11: Creating More Decals
Lecture 12: Placing Decals and Balancing
Lecture 13: Creating the Standup Advert Signs Part 1
Lecture 14: Creating the Standup Advert Signs Part 2
Lecture 15: Creating the Standup Advert Signs Part 3
Lecture 16: Making Tiles Dirty and Adding More Decals
Lecture 17: Making Standup Signs Emmissive
Lecture 18: Adding One More Sign Advert
Lecture 19: Making the Glass Decals Part 1
Lecture 20: Making the Glass Decals Part 2
Lecture 21: Outro
Instructors
-
Victory3D LLC
Dedicated to Transforming The Way Artists Create
Rating Distribution
- 1 stars: 0 votes
- 2 stars: 1 votes
- 3 stars: 7 votes
- 4 stars: 34 votes
- 5 stars: 54 votes
Frequently Asked Questions
How long do I have access to the course materials?
You can view and review the lecture materials indefinitely, like an on-demand channel.
Can I take my courses with me wherever I go?
Definitely! If you have an internet connection, courses on Udemy are available on any device at any time. If you don’t have an internet connection, some instructors also let their students download course lectures. That’s up to the instructor though, so make sure you get on their good side!
You may also like
- Top 10 Video Editing Courses to Learn in November 2024
- Top 10 Music Production Courses to Learn in November 2024
- Top 10 Animation Courses to Learn in November 2024
- Top 10 Digital Illustration Courses to Learn in November 2024
- Top 10 Renewable Energy Courses to Learn in November 2024
- Top 10 Sustainable Living Courses to Learn in November 2024
- Top 10 Ethical AI Courses to Learn in November 2024
- Top 10 Cybersecurity Fundamentals Courses to Learn in November 2024
- Top 10 Smart Home Technology Courses to Learn in November 2024
- Top 10 Holistic Health Courses to Learn in November 2024
- Top 10 Nutrition And Diet Planning Courses to Learn in November 2024
- Top 10 Yoga Instruction Courses to Learn in November 2024
- Top 10 Stress Management Courses to Learn in November 2024
- Top 10 Mindfulness Meditation Courses to Learn in November 2024
- Top 10 Life Coaching Courses to Learn in November 2024
- Top 10 Career Development Courses to Learn in November 2024
- Top 10 Relationship Building Courses to Learn in November 2024
- Top 10 Parenting Skills Courses to Learn in November 2024
- Top 10 Home Improvement Courses to Learn in November 2024
- Top 10 Gardening Courses to Learn in November 2024


