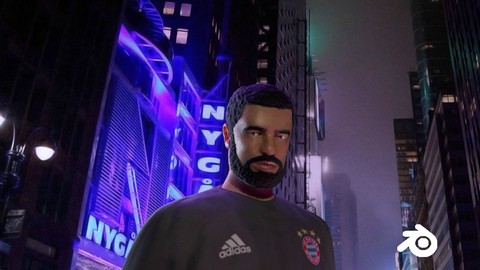
Create & Animate Drake Character in Blender
Create & Animate Drake Character in Blender, available at $39.99, has an average rating of 4.05, with 86 lectures, based on 11 reviews, and has 2166 subscribers.
You will learn about How to model a character in Blender How to create an advanced rig in Blender Weight painting in Blender How to UV unwrap a character in blender How to texture a character in Blender Hair in Blender How to sculpt and bake normal maps in Blender How to rig and animate normal maps in Blender Lip Syncing in Blender Rendering in Blender How to animate a character in Blender This course is ideal for individuals who are Computer literate or Blender enthusiasts who want a character creation process from scratch to finish or Enthusiasts who want to learn to create an advanced character rig or Enthusiasts who want to learn how to animate a character or Enthusiasts who want to learn how to rig and animate normal maps or Intermediate blender users It is particularly useful for Computer literate or Blender enthusiasts who want a character creation process from scratch to finish or Enthusiasts who want to learn to create an advanced character rig or Enthusiasts who want to learn how to animate a character or Enthusiasts who want to learn how to rig and animate normal maps or Intermediate blender users.
Enroll now: Create & Animate Drake Character in Blender
Summary
Title: Create & Animate Drake Character in Blender
Price: $39.99
Average Rating: 4.05
Number of Lectures: 86
Number of Published Lectures: 85
Number of Curriculum Items: 86
Number of Published Curriculum Objects: 85
Original Price: $19.99
Quality Status: approved
Status: Live
What You Will Learn
- How to model a character in Blender
- How to create an advanced rig in Blender
- Weight painting in Blender
- How to UV unwrap a character in blender
- How to texture a character in Blender
- Hair in Blender
- How to sculpt and bake normal maps in Blender
- How to rig and animate normal maps in Blender
- Lip Syncing in Blender
- Rendering in Blender
- How to animate a character in Blender
Who Should Attend
- Computer literate
- Blender enthusiasts who want a character creation process from scratch to finish
- Enthusiasts who want to learn to create an advanced character rig
- Enthusiasts who want to learn how to animate a character
- Enthusiasts who want to learn how to rig and animate normal maps
- Intermediate blender users
Target Audiences
- Computer literate
- Blender enthusiasts who want a character creation process from scratch to finish
- Enthusiasts who want to learn to create an advanced character rig
- Enthusiasts who want to learn how to animate a character
- Enthusiasts who want to learn how to rig and animate normal maps
- Intermediate blender users
***Audio quality is not the best it could be, a bit noisy in the background. I am sorry for this guys and grateful for your understanding***
This is a complete and extensive step by step demonstration course that will show you all steps involved in creating, rigging and animating a character in blender from start to finish. After this course, you would have learnt valuable workflows which will help improve your productivity in blender.
Topics covered include:
1. Modelling a character in blender
Here, we will setup the reference image and model everything from the head and the hands to the trousers and the shoes.
2. Creating an advanced character rig in blender
At this stage, we will create the deformation bones, forward kinematic bones and inverse kinematic bones. we will also rig the eyes, create shape keys and set up drivers for shape keys, create custom bone shapes, create controllers and add a user interface for the controllers.
3. Texturing a character in blender
Here, we will be adding seams, UV unwrapping our model and texturing it. We will be sculpting and baking normal maps, creating specular and bump map, adding subsurface scattering and rigging normal maps.
4. Creating particle hair in blender
We will texture the scalp of our hair and then use blenders powerful particle system to make the hair and beard of our character.
5. Making a pose library
We will create an animators best friend which is a pose library to make our rigging life a lot easier.
6. Animation in blender
In the climax of this course we will be animating our character. we will do some weight painting after which we setup our audio and add markers for our vowels and consonants. we will do lip syncing, create the general motion of our character and then we will render our animation. We will also light up our model.
This course will help you hone your blending skills and i hope you enjoy it.
Course Curriculum
Chapter 1: Introduction
Lecture 1: Introduction
Lecture 2: How to get blender
Chapter 2: Character Modelling in Blender
Lecture 1: Setting up background image
Lecture 2: Modelling the head part 1
Lecture 3: Modelling the head part 2
Lecture 4: Modelling the head part 3
Lecture 5: Modelling the head part 4
Lecture 6: Modelling the head part 5
Lecture 7: Modelling the shirt
Lecture 8: Modelling the trousers
Lecture 9: Modelling the shoes
Lecture 10: Modelling the hands part 1
Lecture 11: Modelling the hands part 2
Chapter 3: Advanced Character Rig in Blender
Lecture 1: Adding and setting up deformation bones
Lecture 2: Adding IK bones
Lecture 3: Adding finger controllers
Lecture 4: Setting up IK bones
Lecture 5: Setting up the character rig I
Lecture 6: rigging the eyes
Lecture 7: Weight painting and correction part 2
Lecture 8: Weight painting and correction part 3
Lecture 9: Setting up FK bones
Lecture 10: Setting up the character rig II
Lecture 11: Adding the teeth and tongue
Lecture 12: Adding and setting up shape keys part 1
Lecture 13: Adding and setting up shape keys part 2
Lecture 14: Adding and setting up shape keys part 3
Lecture 15: Adding and setting up shape keys part 4
Lecture 16: Adding and setting up drivers for shape keys part 1
Lecture 17: Adding and setting up drivers for shape keys part 2
Lecture 18: Creating and using custom bone shapes
Lecture 19: Adding a user interface for the rig controllers
Chapter 4: Texturing
Lecture 1: Texturing the eyeballs
Lecture 2: Adding seams to the model
Lecture 3: Positioning the UV's part 1
Lecture 4: Positioning the UV's part 2
Lecture 5: Texturing the head part 1
Lecture 6: Texturing the head part 2
Lecture 7: Texturing the shirt part 1
Lecture 8: Texturing the shirt part 2
Lecture 9: Texturing the trousers
Lecture 10: Texturing the socks and the shoes part 1
Lecture 11: Texturing the socks and the shoes part 2
Lecture 12: Texturing the socks and the shoes part 3
Lecture 13: Texturing the socks and the shoes part 4
Lecture 14: Texturing the hands part 1
Lecture 15: Texturing the hands part 2
Lecture 16: Texturing the hands part 3
Lecture 17: Sculpting and baking normals part 1
Lecture 18: Sculpting and baking normals part 2
Lecture 19: Creating the bump map
Lecture 20: Creating the specular map
Lecture 21: Subsurface scattering
Lecture 22: Improving the model I
Lecture 23: Normal map rigging part 1
Lecture 24: Normal map rigging part 2
Lecture 25: Normal map rigging part 3
Lecture 26: Normal map rigging part 4
Lecture 27: Normal map rigging part 5
Lecture 28: Improving the model II
Chapter 5: Hair
Lecture 1: Texturing the hair's scalp
Lecture 2: Hair particles part 1
Lecture 3: Hair particles part 2
Chapter 6: Pose Library
Lecture 1: Weight painting and correction part 1
Lecture 2: Pose library part 1
Lecture 3: Pose library part 2
Lecture 4: Pose library part 3
Lecture 5: Pose library part 4
Lecture 6: Pose library part 5
Chapter 7: Animation
Lecture 1: Correcting the weight paint
Lecture 2: Setting up the audio
Lecture 3: Adding markers
Lecture 4: Improving the model I
Lecture 5: Lip syncing part 1
Lecture 6: Lip syncing part 2
Lecture 7: Lip syncing part 3
Lecture 8: General character movements I part 1
Lecture 9: General character movements I part 2
Lecture 10: General character movements I part 3
Lecture 11: Improving the model II
Lecture 12: General character movements II part 1
Lecture 13: General character movements II part 2
Lecture 14: Improving the model III part 1
Lecture 15: Improving the model III part 2
Lecture 16: Rendering the animation
Instructors
-
Blender College
3D Technology
Rating Distribution
- 1 stars: 0 votes
- 2 stars: 2 votes
- 3 stars: 1 votes
- 4 stars: 3 votes
- 5 stars: 5 votes
Frequently Asked Questions
How long do I have access to the course materials?
You can view and review the lecture materials indefinitely, like an on-demand channel.
Can I take my courses with me wherever I go?
Definitely! If you have an internet connection, courses on Udemy are available on any device at any time. If you don’t have an internet connection, some instructors also let their students download course lectures. That’s up to the instructor though, so make sure you get on their good side!
You may also like
- Top 10 Language Learning Courses to Learn in November 2024
- Top 10 Video Editing Courses to Learn in November 2024
- Top 10 Music Production Courses to Learn in November 2024
- Top 10 Animation Courses to Learn in November 2024
- Top 10 Digital Illustration Courses to Learn in November 2024
- Top 10 Renewable Energy Courses to Learn in November 2024
- Top 10 Sustainable Living Courses to Learn in November 2024
- Top 10 Ethical AI Courses to Learn in November 2024
- Top 10 Cybersecurity Fundamentals Courses to Learn in November 2024
- Top 10 Smart Home Technology Courses to Learn in November 2024
- Top 10 Holistic Health Courses to Learn in November 2024
- Top 10 Nutrition And Diet Planning Courses to Learn in November 2024
- Top 10 Yoga Instruction Courses to Learn in November 2024
- Top 10 Stress Management Courses to Learn in November 2024
- Top 10 Mindfulness Meditation Courses to Learn in November 2024
- Top 10 Life Coaching Courses to Learn in November 2024
- Top 10 Career Development Courses to Learn in November 2024
- Top 10 Relationship Building Courses to Learn in November 2024
- Top 10 Parenting Skills Courses to Learn in November 2024
- Top 10 Home Improvement Courses to Learn in November 2024


