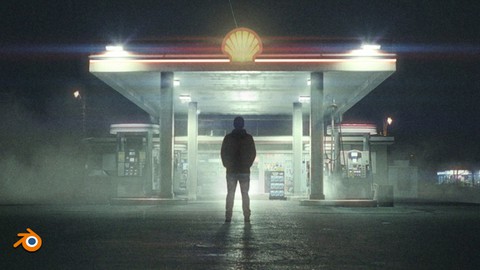
A quick way to build a realistic scene in Blender
A quick way to build a realistic scene in Blender, available at $64.99, has an average rating of 4.63, with 16 lectures, based on 4 reviews, and has 73 subscribers.
You will learn about I will introduce you to the free 3d program Blender I will introduce you to modeling, texturing, lighting, rendering, post-processing and more I will show you how to create a cinematic scene in the best way I'll show you how to get a realistic scene in blender more easily I will teach you how to properly extend image in Blender This course is ideal for individuals who are For blender beginners as well as more advanced users. It is particularly useful for For blender beginners as well as more advanced users.
Enroll now: A quick way to build a realistic scene in Blender
Summary
Title: A quick way to build a realistic scene in Blender
Price: $64.99
Average Rating: 4.63
Number of Lectures: 16
Number of Published Lectures: 15
Number of Curriculum Items: 16
Number of Published Curriculum Objects: 15
Original Price: $19.99
Quality Status: approved
Status: Live
What You Will Learn
- I will introduce you to the free 3d program Blender
- I will introduce you to modeling, texturing, lighting, rendering, post-processing and more
- I will show you how to create a cinematic scene in the best way
- I'll show you how to get a realistic scene in blender more easily
- I will teach you how to properly extend image in Blender
Who Should Attend
- For blender beginners as well as more advanced users.
Target Audiences
- For blender beginners as well as more advanced users.
Creating a fully CGI scene is fun but also a time-consuming job and requires a lot of skills to make everything look realistic. From modeling or finding models, texturing, lighting, post-processing, etc. But what if we already have a photo or video that we just want to extend with some elements?
In this tutorial, we will talk about exactly that. How to extend a photo with 3D elements in a free program blender.
We’ll talk about how to import an image and camera into a blender with the correct perspective.
How to set lighting, shadows, and reflection to match the photo.
How to enrich the visual boring and low-resolution textures.
Where to find and how to add overlays that will make the scene more cinematic.
We will talk about post-processing color grading and much more.
At the end of this tutorial, you will be able to extend any photo with any 3d elements and get more realistic renders in a faster way.
All resources and links are included + final .blend file
No previous blender experience is required for this tutorial. The tutorial is step-by-step and is also intended for beginners.
Part 1 – Inspiration and preparation (7 min)
Part 2 – F-spy (14 min)
Part 3 – Blender, camera, and character import (7 min)
Part 4 – Combining background image and render (5 min)
Part 5 – Gas station modeling (15 min)
Part 6 – Creating lighting and shadows (15 min)
Part 7 – UV Project modifier (6 min)
Part 8 – Color matching (5 min)
Part 9 – Improving textures (6 min)
Part 10 – Creating reflections on the ground (12 min)
Part 11 – Adding details (9 min)
Part 12 – Overlays (11 min)
Part 13 – Post-processing – Part 1 (9 min)
Part 14 – Post-processing – Part 2 (12 min
Course Curriculum
Chapter 1: Introduction
Lecture 1: Tutorial introduction
Lecture 2: Inspiration and preparation
Lecture 3: F-spy
Lecture 4: Blender, camera, and character import
Lecture 5: Combining background image and render
Lecture 6: Gas station modeling
Lecture 7: 06_LIGHTING_AND_SHADOWS
Lecture 8: Creating lighting and shadows
Lecture 9: Color matching
Lecture 10: Improving textures
Lecture 11: Creating reflections on the ground
Lecture 12: Adding details
Lecture 13: Overlays
Lecture 14: Post-processing – Part 1
Lecture 15: Post-processing – Part 2
Instructors
-
Sime Bugarija
I teach 3d visualization in Blender
Rating Distribution
- 1 stars: 0 votes
- 2 stars: 0 votes
- 3 stars: 0 votes
- 4 stars: 2 votes
- 5 stars: 2 votes
Frequently Asked Questions
How long do I have access to the course materials?
You can view and review the lecture materials indefinitely, like an on-demand channel.
Can I take my courses with me wherever I go?
Definitely! If you have an internet connection, courses on Udemy are available on any device at any time. If you don’t have an internet connection, some instructors also let their students download course lectures. That’s up to the instructor though, so make sure you get on their good side!
You may also like
- Top 10 Language Learning Courses to Learn in November 2024
- Top 10 Video Editing Courses to Learn in November 2024
- Top 10 Music Production Courses to Learn in November 2024
- Top 10 Animation Courses to Learn in November 2024
- Top 10 Digital Illustration Courses to Learn in November 2024
- Top 10 Renewable Energy Courses to Learn in November 2024
- Top 10 Sustainable Living Courses to Learn in November 2024
- Top 10 Ethical AI Courses to Learn in November 2024
- Top 10 Cybersecurity Fundamentals Courses to Learn in November 2024
- Top 10 Smart Home Technology Courses to Learn in November 2024
- Top 10 Holistic Health Courses to Learn in November 2024
- Top 10 Nutrition And Diet Planning Courses to Learn in November 2024
- Top 10 Yoga Instruction Courses to Learn in November 2024
- Top 10 Stress Management Courses to Learn in November 2024
- Top 10 Mindfulness Meditation Courses to Learn in November 2024
- Top 10 Life Coaching Courses to Learn in November 2024
- Top 10 Career Development Courses to Learn in November 2024
- Top 10 Relationship Building Courses to Learn in November 2024
- Top 10 Parenting Skills Courses to Learn in November 2024
- Top 10 Home Improvement Courses to Learn in November 2024


