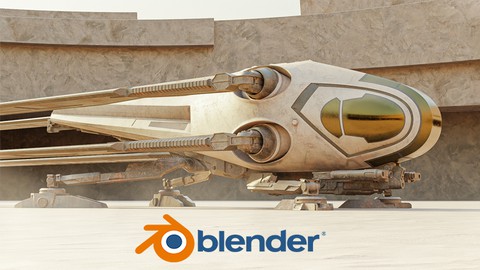
BLENDER: Creating the Dune Ornithopter from start to finish
BLENDER: Creating the Dune Ornithopter from start to finish, available at $79.99, has an average rating of 4.85, with 162 lectures, based on 98 reviews, and has 978 subscribers.
You will learn about Learn How to model the Ornithopter from start to finish with all steps covered Learn how to unwrap inside Blender, we will unwrap all the parts. Learn how to use UDIMs to create multiple UVs for one object to get high resolution result Learn how to use Substance Painter to texture the Ornithopter This course is ideal for individuals who are This course for intermediate Blender users who loves to create challenging projects It is particularly useful for This course for intermediate Blender users who loves to create challenging projects.
Enroll now: BLENDER: Creating the Dune Ornithopter from start to finish
Summary
Title: BLENDER: Creating the Dune Ornithopter from start to finish
Price: $79.99
Average Rating: 4.85
Number of Lectures: 162
Number of Published Lectures: 162
Number of Curriculum Items: 162
Number of Published Curriculum Objects: 162
Original Price: $124.99
Quality Status: approved
Status: Live
What You Will Learn
- Learn How to model the Ornithopter from start to finish with all steps covered
- Learn how to unwrap inside Blender, we will unwrap all the parts.
- Learn how to use UDIMs to create multiple UVs for one object to get high resolution result
- Learn how to use Substance Painter to texture the Ornithopter
Who Should Attend
- This course for intermediate Blender users who loves to create challenging projects
Target Audiences
- This course for intermediate Blender users who loves to create challenging projects
Hello everyone, my name is Marwan Hussein, and I welcome you to my new fantastic course.
How to create The Dune Ornithopter with Blender and Substance Painter from start to finish.
A lot of Blender users watch movies on TVs or on their computes, and most of them love to create something they liked on that screen, even me when I watch something on the screen I tell myself, I like to create that thing, it’s nice challenging feeling the artist feels when he sees something interesting on the screen.
When I saw The Dune movie I loved a lot of stuff there, the thing I loved the most is the 2 set Ornithopter for the Fremen, at that time I decided to create this amazing artwork, it was very challenging, and not so quite easy to create but I did it in the end.
It was really nice journey of modeling and texturing ext…
When I completed the design I immediately started recording this course it was so challenging course I admitted, but the result was very nice and beautiful.
In this course we will cover modeling, we will model the Ornithopter from start to finish, I got all the Blueprint images ready in the Project folder section, download them from there to start the modeling journey.
In the modeling section, we will learn a lot of stuff, at the end of the day we want a clean and fast way to create all the Ornithopter parts so we need a good technique to achieve that, so that is what I’m about to teach you in that section.
After the modeling section, we will learn step by step how to unwrap all the parts, this section is a very good section for the student who has some problems understanding how the UV is created, we will create a lot of parts step by step until you master the unwrapping side.
When we complete unwrapping all the parts, we will learn how to use UDIMs to create multiple UVs for one object to get very high-resolution results, and that’s very helpful for the close camera shots and for the artist who cares about the details.
Now the Dune Ornithopter is ready to take out of Blender to Substance Painter, and there we will learn step by step how to texture the 3D model there and how to take the advantage of the UDIMs to create highly details UV textures.
We are not finished there, after all of that we will send the model back to Blender and we will learn how to import all the UV textures in the correct way.
After the textured side is finished we will use the Armature ( the Bone system ) to rig the Ornithopter, we will create bones for the wings and for the legs, and for the body, we will add all the necessary bones to make the Ornithopter ready to fly or to bose it to take a nice shot, all of that we will do it step by step.
After the rigging section now we are ready to render the scene, but we need an environment to put the Ornithopter in, so we will learn how to create a nice environment to achieve that, we will use a nice technique to tile the texture without you notice the image repetition.
After we take the shots we will send the render result to photoshop to make some post-processing, and we will use the compositor as well to add the final touch for the next rendered images, which means we will learn how to post-processing the image in Blender and out of Blender.
In the end, I hope you find this course useful and entertaining, my name is Marwan Hussein and I hope you get the benefit from this course and all my courses.
On SkillShare we should create a description for the course and project description, I want you to create for me short project description to use it in SkillShare for my Dune course please
Course Curriculum
Chapter 1: Introduction
Lecture 1: Introduction
Lecture 2: Before you start
Chapter 2: Modeling
Lecture 1: 003_Adding the reference images
Lecture 2: 004_Scaling the images
Lecture 3: 005_Modeling section_start modeling the Ornithopter
Lecture 4: 006_Modeling section_Modeling the front side of the Thopter
Lecture 5: 007_Modeling section_Modeling the top area of the body
Lecture 6: 008_Modeling section_Modeling the middle bottom side of the Thopter
Lecture 7: 009_Modeling section_Modeling the tail of the Thopter
Lecture 8: 010_Modeling section_fixing some issues
Lecture 9: 011_Modeling section_completing the wings holes and adding subdivision surface
Lecture 10: 012_Modeling section_Creating the windshield
Lecture 11: 013_Modeling section_Creating the door
Lecture 12: 014_Modeling section_Using shrinkwrap modifier to fix the door shading issues
Lecture 13: 015_Modeling section_Creating the door window part 1
Lecture 14: 016_Modeling section_Creating the second door window
Lecture 15: 017_Modeling section_Creating the door and windshield frame
Lecture 16: 018_Modeling section_Adding details to the body part 1
Lecture 17: 019_Modeling section_Adding Bevel modifier
Lecture 18: 020_Modeling section_Using solidify to create rims
Lecture 19: 021_Modeling section_Learn how to use Bool Tool
Lecture 20: 022_Modeling section_Start modeling the top body details part 1
Lecture 21: 023_Modeling section_Start modeling the top body details part 2
Lecture 22: 024_Modeling section_Start modeling the top body details part 3
Lecture 23: 025_Modeling section_Start start with the top tail details
Lecture 24: 026_Modeling section_Start with the top tail details 2
Lecture 25: 027_Modeling section_Add Bevel modifier to the top details of the Ornithopter
Lecture 26: 028_Modeling section_Learn how to use Carver tool
Lecture 27: 029_Modeling section_Creating the front light detials
Lecture 28: 030_Modeling section_Creating the front light details part 2
Lecture 29: 031_Modeling section_Creating the front light details part 3
Lecture 30: 032_Modeling section_Creating the front light details part 4
Lecture 31: 033_Modeling section_Creating the front light details part 5
Lecture 32: 034_Modeling section_Creating the front light details part 6
Lecture 33: 035_Modeling section_Adding Bevel to the light part 1
Lecture 34: 036_Modeling section_Adding Bevel to the light and fixing some problems part 2
Lecture 35: 037_Modeling section_Bottom parts part 1
Lecture 36: 038_Modeling section_Bottom parts part 2
Lecture 37: 039_Modeling section_Bottom parts part 3
Lecture 38: 040_Modeling section_Bottom parts part 4
Lecture 39: 041_Modeling section_Bottom parts part 5
Lecture 40: 042_Modeling section_Bottom parts part 6
Lecture 41: 043_Modeling section_Bottom parts part 7
Lecture 42: 044_Modeling section_Bottom parts part 8
Lecture 43: 045_Modeling section_Bottom parts part 9
Lecture 44: 046_Modeling section_Bottom parts part 10
Lecture 45: 047_Modeling section_Bottom parts part 11
Lecture 46: 048_Modeling section_Bottom parts part 12
Lecture 47: 049_Modeling section_Bottom parts part 13
Lecture 48: 050_Modeling section_Bottom parts part 14
Lecture 49: 051_Modeling section_Bottom parts part 15
Lecture 50: 052_Modeling section_Bottom parts part 16
Lecture 51: 053_Modeling section_Creating the front leg joints and the bolts
Lecture 52: 054_Modeling section_Creating the back leg joints part 1
Lecture 53: 055_Modeling section_Creating the back leg joints part 2
Lecture 54: 056_Modeling section_ Small parts left to finish the bottom ornithopter side
Lecture 55: 057_Modeling section_Adding Bevel modifier
Lecture 56: 058_Modeling section_Adding Bevel modifier part 2
Lecture 57: 059_Modeling section_Adding Bevel modifier part 3
Lecture 58: 060_Modeling section_Adding Bevel modifier part 4
Lecture 59: 061_Modeling section_Adding Bevel modifier part 5
Lecture 60: 062_Modeling section_Adding Bevel modifier part 6
Lecture 61: 063_Modeling section_Adding Bevel modifier part 7
Lecture 62: 064_Modeling section_Adding Bevel modifier part 8
Lecture 63: 065_Modeling section_Starting with the front legs part 1
Lecture 64: 066_Modeling section_Starting with the front legs part 2
Lecture 65: 067_Modeling section_Starting with the front legs part 3
Lecture 66: 068_Modeling section_Starting with the front legs part 4
Lecture 67: 069_Modeling section_Starting with the front legs part 5
Lecture 68: 070_Modeling section_Starting with the front legs part 6
Lecture 69: 071_Modeling section_Starting with the front legs part 7
Lecture 70: 072_Modeling section_Starting with the back legs part 2
Lecture 71: 073_Modeling section_Starting with the back legs part 3
Lecture 72: 074_Modeling section_Starting with the back legs part 4
Lecture 73: 075_Modeling section_Adding bevel modifier to the front legs part 1
Lecture 74: 076_Modeling section_Adding bevel modifier to the front legs part 2
Lecture 75: 077_Modeling section_Adding bevel modifier to the Back legs part 1
Lecture 76: 078_Modeling section_Adding bevel modifier to the Back legs part 2
Lecture 77: 079_Modeling section_Aligning the back leg joint to the legs arm
Lecture 78: 080_Modeling section_Starting with the wings part 1
Lecture 79: 081_Modeling section_Starting with the wings part 2
Lecture 80: 082_Modeling section_Starting with the wings part 3
Lecture 81: 083_Modeling section_Starting with the wings part 4
Lecture 82: 084_Modeling section_Starting with the wings part 5
Lecture 83: 085_Modeling section_Adding Bevel modifier to the wing
Lecture 84: 086_Modeling section_Creating the Grill to the ornithopter tail
Lecture 85: 087_Modeling section_Adding lines to the Body part 1
Lecture 86: 088_Modeling section_Adding lines to the Body part 2
Lecture 87: 089_Modeling section_Adding lines to the Body part 3
Lecture 88: 090_Modeling section_Finishing the body lines and adding a frames to the windshi
Lecture 89: 091_Modeling section_Adding solidify to the doors
Lecture 90: 092_Modeling section_Creating the door handle
Chapter 3: Unwrapping
Lecture 1: 093_Unwrapping section_Starting with the body part 1
Lecture 2: 094_Unwrapping section_Starting with the body part 2
Lecture 3: 095_Unwrapping section_Starting with the body part 3
Lecture 4: 096_Unwrapping section_Starting with the body part 4
Lecture 5: 097_Unwrapping section_unwrapping the body using udims part 1
Instructors
-
Mrawan Hussain
3D,2D artist, and internet marketer.
Rating Distribution
- 1 stars: 0 votes
- 2 stars: 0 votes
- 3 stars: 3 votes
- 4 stars: 22 votes
- 5 stars: 73 votes
Frequently Asked Questions
How long do I have access to the course materials?
You can view and review the lecture materials indefinitely, like an on-demand channel.
Can I take my courses with me wherever I go?
Definitely! If you have an internet connection, courses on Udemy are available on any device at any time. If you don’t have an internet connection, some instructors also let their students download course lectures. That’s up to the instructor though, so make sure you get on their good side!
You may also like
- Top 10 Video Editing Courses to Learn in November 2024
- Top 10 Music Production Courses to Learn in November 2024
- Top 10 Animation Courses to Learn in November 2024
- Top 10 Digital Illustration Courses to Learn in November 2024
- Top 10 Renewable Energy Courses to Learn in November 2024
- Top 10 Sustainable Living Courses to Learn in November 2024
- Top 10 Ethical AI Courses to Learn in November 2024
- Top 10 Cybersecurity Fundamentals Courses to Learn in November 2024
- Top 10 Smart Home Technology Courses to Learn in November 2024
- Top 10 Holistic Health Courses to Learn in November 2024
- Top 10 Nutrition And Diet Planning Courses to Learn in November 2024
- Top 10 Yoga Instruction Courses to Learn in November 2024
- Top 10 Stress Management Courses to Learn in November 2024
- Top 10 Mindfulness Meditation Courses to Learn in November 2024
- Top 10 Life Coaching Courses to Learn in November 2024
- Top 10 Career Development Courses to Learn in November 2024
- Top 10 Relationship Building Courses to Learn in November 2024
- Top 10 Parenting Skills Courses to Learn in November 2024
- Top 10 Home Improvement Courses to Learn in November 2024
- Top 10 Gardening Courses to Learn in November 2024


