
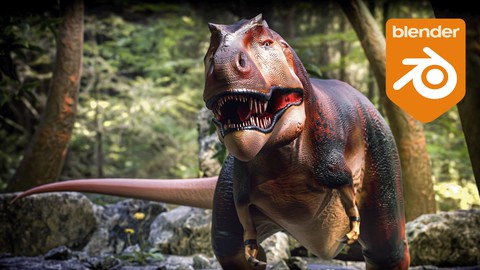
Create a Tyrannosaurus Rex Dinosaur in Blender 3.0 +
Create a Tyrannosaurus Rex Dinosaur in Blender 3.0 +, available at $79.99, has an average rating of 4.75, with 131 lectures, based on 46 reviews, and has 367 subscribers.
You will learn about Create a dinosaur from start to finish Understand the importance of good typology Working with a low to high poly model set-up Utilize and properly set-up blueprints for modeling reference guides Sculpt muscles and scales onto dinosaur using both manual brush work and alpha brushes Baking texture maps using a multi-resolution and cage Managing a shader node set-up Render out a finalized image for your portfolio This course is ideal for individuals who are Blender users interested in the workflow creation of a prehistoric dinosaur. or Blender users looking to learn new methods when approaching their models or Students looking for an in-depth and extensive training course or Artists looking to challenge themselves It is particularly useful for Blender users interested in the workflow creation of a prehistoric dinosaur. or Blender users looking to learn new methods when approaching their models or Students looking for an in-depth and extensive training course or Artists looking to challenge themselves.
Enroll now: Create a Tyrannosaurus Rex Dinosaur in Blender 3.0 +
Summary
Title: Create a Tyrannosaurus Rex Dinosaur in Blender 3.0 +
Price: $79.99
Average Rating: 4.75
Number of Lectures: 131
Number of Published Lectures: 131
Number of Curriculum Items: 131
Number of Published Curriculum Objects: 131
Original Price: $74.99
Quality Status: approved
Status: Live
What You Will Learn
- Create a dinosaur from start to finish
- Understand the importance of good typology
- Working with a low to high poly model set-up
- Utilize and properly set-up blueprints for modeling reference guides
- Sculpt muscles and scales onto dinosaur using both manual brush work and alpha brushes
- Baking texture maps using a multi-resolution and cage
- Managing a shader node set-up
- Render out a finalized image for your portfolio
Who Should Attend
- Blender users interested in the workflow creation of a prehistoric dinosaur.
- Blender users looking to learn new methods when approaching their models
- Students looking for an in-depth and extensive training course
- Artists looking to challenge themselves
Target Audiences
- Blender users interested in the workflow creation of a prehistoric dinosaur.
- Blender users looking to learn new methods when approaching their models
- Students looking for an in-depth and extensive training course
- Artists looking to challenge themselves
In this course, you will be able to create a dinosaur from scratch to finish. You will learn the in’s and out’s when it comes to creating a finalized portfolio piece. What’s even better is this course is geared and created with an open-sourced program called Blender!
Inside this course, I do my absolute best to explain every process using real-time footage and explanations. You can see every click and change that I do within the video. The course is in-depth as it is nearly 40 hours long!
The Workflow:
* Create a low to high poly T-Rex
* Sculpt using a multiresolution modifier
* UV unwrap
* Bake information onto texture maps
* Pose
* Create a scene
* Post-editing
What you can expect inside:
This course is designed with the intention of creating a finalized render for your portfolio.
Throughout the modeling stages of the T-Rex, we will start with designing a low poly T-Rex.
The process will entail using a multi-resolution modifier that we will enable once we get into the sculpting stages of the course. From that point, we will be baking our high poly information onto our low poly dinosaur via texture maps.
We will use several different techniques to bake our texture maps; one technique that is extremely usefulis called a cage.
The next stages will include creating an armature, dealing with bones, and inverse kinematics so that we can pose our dinosaur.
We then create our scene with much more environmental detail.
Lastly, we render and finish up with some compositing!
Learn how to:
* Insert blueprint references
* Create a model from blueprint references
* Join several pieces of geometry into one object
* Utilize different tools and add-ons featured within Blender
* Use alpha brushes to create scales on your T-Rex
* Create your own alpha textures
* UV unwrap your model
* Create two different base colors for your Rex.
* Create several different texture maps that will bring your T-Rex to life!
* Finalize the scene with plants, trees, and lights for a final render.
* Lastly, composite your T-Rex to apply final effects!
… There is so much more inside the course!
This course was designed and created using Blender 3.0 + but is compatible with 4.0 and up
Course Curriculum
Chapter 1: Preparation and Working with References
Lecture 1: Insert References
Lecture 2: Testing References
Chapter 2: Resources Used Throughout Course
Lecture 1: RESOURCE BULK FOLDER
Lecture 2: Modeling References
Lecture 3: Sculpting Add-ons
Lecture 4: Sculpting Alpha's
Lecture 5: HDRI for Texturing
Lecture 6: Texture Painting Reference
Lecture 7: Rendering Resources
Lecture 8: Official Blender Course Files
Chapter 3: Enabling Add-ons
Lecture 1: Enabling Add-ons
Chapter 4: MODELING: Body & Tail
Lecture 1: Model the Body
Lecture 2: Model the Tail
Chapter 5: MODELING: Rear Feet
Lecture 1: The UV Editor for Referencing
Lecture 2: Modeling a Toe
Lecture 3: Middle Toe
Lecture 4: Larger Toe
Lecture 5: Joining the Toes
Chapter 6: MODELING: Rear Leg
Lecture 1: Extruding the Foot and Creating the Leg
Lecture 2: Creating the Last Inner Toe
Lecture 3: Joining the Leg to the Body
Lecture 4: Mirroring and Checking the Silhouette
Lecture 5: Adjusting the Mesh with Sculpt Mode
Lecture 6: Adding and Adjusting the Knee Cap
Chapter 7: MODELING: Fingers and Arm
Lecture 1: Begin Modeling the Fingers
Lecture 2: Joining the Arm to the Body
Lecture 3: Making Arm Adjustments
Chapter 8: MODELING: Begin Modeling the Face
Lecture 1: Creating the Skull
Lecture 2: Adjusting the Shape of the Arm & Leg
Lecture 3: Extruding the Mouth
Lecture 4: Finishing the Mouth
Lecture 5: Defining the Gumline
Lecture 6: Creating the Nostril
Lecture 7: Creating the Eye Socket
Lecture 8: Adjusting the Shape of the Skull
Lecture 9: Continuing Skull Adjustments
Lecture 10: Creating a Neckline
Lecture 11: Finalizing the Eye and Nose
Lecture 12: Creating the Ear
Chapter 9: MODELING: Making Refinements
Lecture 1: Arm
Lecture 2: Leg
Lecture 3: Full Body
Lecture 4: Final Checks
Chapter 10: MODELING: Modeling the Teeth
Lecture 1: Creating the Teeth
Lecture 2: Placing Teeth Inside Upper Jaw
Lecture 3: Placing Teeth Inside Bottom Jaw
Lecture 4: Joining the Teeth
Lecture 5: Checking UV's
Chapter 11: MODELING: Modeling the Eye
Lecture 1: Creating the Eyeball
Chapter 12: MODELING: Modeling Final Checks
Lecture 1: Final Checks
Chapter 13: SCULPTING: Early Sculpting Stages (Level 1)
Lecture 1: Preparation Before Sculpting
Lecture 2: Face Sets
Lecture 3: Shoulder & Arm
Lecture 4: Feet
Lecture 5: Leg
Lecture 6: Ribs
Lecture 7: Chest & Neck
Lecture 8: Skull
Lecture 9: Tail & Modifications
Chapter 14: SCULPTING: Sculpting Further Details (Level 2)
Lecture 1: Installing Files & Add-on
Lecture 2: Drawing Distress Marks
Lecture 3: Detailing the Mouth
Chapter 15: SCULPTING: Sculpting the Wrinkles and Scales
Lecture 1: Wrinkle Detailing Part 1
Lecture 2: Wrinkle Detailing Part 2
Lecture 3: Scales Detailing: Upper Body (Part 1)
Lecture 4: Scales Detailing Part 2
Lecture 5: Scales: Tail (Part 3)
Lecture 6: Scales: Spine and Head (Part 4)
Lecture 7: Scales: Head and Miscellaneous (Part 5)
Lecture 8: Scales: Gum (Part 6)
Lecture 9: Scales: Veins and Final Touches (Part 7)
Chapter 16: UV UNWRAPPING
Lecture 1: Improving Memory Usage
Lecture 2: Unwrapping the Eye
Lecture 3: Unwrapping the Legs
Lecture 4: Unwrapping the Arms
Lecture 5: Unwrapping the Head (Part 1)
Lecture 6: Unwrapping the Head (Part 2)
Lecture 7: Managing the UV Grid
Lecture 8: Finishing the UV Grid Layout
Chapter 17: TEXTURING: Baking Map Information
Lecture 1: Baking the Normal Map
Lecture 2: Baking the AO Map (Part 1)
Lecture 3: Baking the AO Map and Cage Creation (Part 2)
Lecture 4: Baking the Curvature Map
Instructors
-

Rachele Projects
3D Artist

Rating Distribution
- 1 stars: 0 votes
- 2 stars: 1 votes
- 3 stars: 2 votes
- 4 stars: 10 votes
- 5 stars: 33 votes
Frequently Asked Questions
How long do I have access to the course materials?
You can view and review the lecture materials indefinitely, like an on-demand channel.
Can I take my courses with me wherever I go?
Definitely! If you have an internet connection, courses on Udemy are available on any device at any time. If you don’t have an internet connection, some instructors also let their students download course lectures. That’s up to the instructor though, so make sure you get on their good side!

- Top 10 Mobile App Development Courses to Learn in December 2024
- Top 10 Graphic Design Courses to Learn in December 2024
- Top 10 Videography Courses to Learn in December 2024
- Top 10 Photography Courses to Learn in December 2024
- Top 10 Language Learning Courses to Learn in December 2024
- Top 10 Product Management Courses to Learn in December 2024
- Top 10 Investing Courses to Learn in December 2024
- Top 10 Personal Finance Courses to Learn in December 2024
- Top 10 Health And Wellness Courses to Learn in December 2024
- Top 10 Chatgpt And Ai Tools Courses to Learn in December 2024
- Top 10 Virtual Reality Courses to Learn in December 2024
- Top 10 Augmented Reality Courses to Learn in December 2024
- Top 10 Blockchain Development Courses to Learn in December 2024
- Top 10 Unity Game Development Courses to Learn in December 2024
- Top 10 Artificial Intelligence Courses to Learn in December 2024
- Top 10 Flutter Development Courses to Learn in December 2024
- Top 10 Docker Kubernetes Courses to Learn in December 2024
- Top 10 Business Analytics Courses to Learn in December 2024
- Top 10 Excel Vba Courses to Learn in December 2024
- Top 10 Devops Courses to Learn in December 2024