
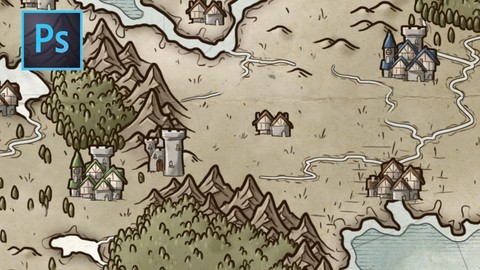
Fantasy Maps in Photoshop
Fantasy Maps in Photoshop, available at $39.99, has an average rating of 4.2, with 19 lectures, based on 22 reviews, and has 70 subscribers.
You will learn about By the end of this course you'll be able to draw fantasy maps that perfectly fit your campaign or story. This course is ideal for individuals who are Anyone interested in bringing their fictional worlds to live by creating a map for it! It is particularly useful for Anyone interested in bringing their fictional worlds to live by creating a map for it!.
Enroll now: Fantasy Maps in Photoshop
Summary
Title: Fantasy Maps in Photoshop
Price: $39.99
Average Rating: 4.2
Number of Lectures: 19
Number of Published Lectures: 19
Number of Curriculum Items: 19
Number of Published Curriculum Objects: 19
Original Price: $39.99
Quality Status: approved
Status: Live
What You Will Learn
- By the end of this course you'll be able to draw fantasy maps that perfectly fit your campaign or story.
Who Should Attend
- Anyone interested in bringing their fictional worlds to live by creating a map for it!
Target Audiences
- Anyone interested in bringing their fictional worlds to live by creating a map for it!
What Will You Learn?
Coastlines
-
Drawing Coastlines: In this lesson we’ll discuss what tools you can use to draw your coastlines. I’ll show you how to make your coastlines look realistic by giving advice on what to do and what not to do.
-
Coastal Effects: I’ll go about a couple of ways to make your coastlines pop out by adding some effects to them. We’ll use basic techniques to create an appealing effect and style to help viewers make out what’s what.
-
Land & Sea: We’ll take a look at how to colour and texture your land and sea to create a solid base for your fantasy map. Again we’ll be using basic Photoshop tools and techniques to get the desired results.
Terrain Features
-
Mountain Styles:In this lesson I’ll show a couple of different ways that you can draw mountains and we’ll discuss how to decide which style suits your map. I’ll show examples of mountains drawn in isometric style, from a ridgeline, and top-down mountains.
-
Drawing Mountains:We’ll go over my process of drawing mountains on my maps. I’ll share some of my ideas of what looks good and what doesn’t.
-
Rivers:Now we’ll take a look at your rivers. How do they flow, and how to you draw them? You’ll also learn some basic rules to keep in mind when laying out your river systems.
-
Forest Styles:You’ll learn a couple of ways of drawing forests. We’ll also learn ways to show different kinds of forests: coniferous, deciduous and jungles and in different styles: single trees, grouped trees and top-down trees.
-
Drawing Forests:Now it’s time to put your forests on your map. We’ll discuss how to make the forests interact with the mountains and rivers, and also where they’ll grow..
-
Terrain Features:Now that we’ve got all our terrain features in place it’s time to show the terrain types in between them. In this lesson we’ll add some texture to your grassland, desert, swampy and barren areas to help viewers understand what’s what.
Icons and Labels
-
Rules about Labeling:In this lesson we’ll go over some important rules to keep in mind when placing your labels on your map. This covers different type- and style sizes, but also where to position your labels.
-
Creating Icons:We’ll go over the process of creating icon sets for your maps. We’ll go from basic sketches to finished designs. When the labels are done we’ll go over to our map and put them in place.
-
Label Hierarchy:Determining the hierarchy for your labels is a very important step. This includes type style and size.
-
Placing Labels:Finally it’s time to start putting the labels in our map. In this lesson we’ll apply all the rules and elements that we’ve learned in the previous lessons. We’ll also see how some rules might contradict each other and learn what to keep in mind when making compromises.
-
Making Labels Readable:When all the labels are places you’ll see that most of them are not perfectly readable. Most labels will be obstructed by terrain features or coastlines. In this lesson we’ll go over some techniques to make sure your labels are readable.
Colours and Details
-
Flat Colours: In this lesson you’ll learn how to lay out the flat colours for your map, step by step. We’ll start with colouring the mountains, then the forests and finally the icons.
-
Shading:Next we’ll add some rough shading to all these features and when the basic shading is done we’ll go over everything to add more detailed shading.
-
Lighting: After the shading is done we’ll start adding some light. We’ll follow a similar process as before, but with some slight changes and shortcuts for a more efficient workflow.
-
Finishing Touches: In this final lesson we’ll cover a variety of things. We’ll start with manipulating our lines to make them blend in with the map more. Next we’ll add some add some decorative rhumblines to the map. Finally we’ll add a parchment texture to give your map a worn and authentic look.
Course Curriculum
Chapter 1: Introduction
Lecture 1: Introduction
Chapter 2: Coastlines
Lecture 1: Drawing Coastlines
Lecture 2: Coastal Effects
Lecture 3: Land and Sea
Chapter 3: Terrain Features
Lecture 1: Mountain Styles
Lecture 2: Drawing Mountains
Lecture 3: Rivers
Lecture 4: Forest Styles
Lecture 5: Drawing Forests
Lecture 6: Terrain Textures
Chapter 4: Icons and Labels
Lecture 1: Rules for Labels
Lecture 2: Creating and Placing Icons
Lecture 3: Label Hierarchy
Lecture 4: Placing Labels
Lecture 5: Making Labels Readable
Chapter 5: Colour and Details
Lecture 1: Flat Colours
Lecture 2: Shading
Lecture 3: Lighting
Lecture 4: Finishing Touches
Instructors
-

Daniel Hasenbos
Freelance Cartographer

Rating Distribution
- 1 stars: 0 votes
- 2 stars: 2 votes
- 3 stars: 1 votes
- 4 stars: 9 votes
- 5 stars: 10 votes
Frequently Asked Questions
How long do I have access to the course materials?
You can view and review the lecture materials indefinitely, like an on-demand channel.
Can I take my courses with me wherever I go?
Definitely! If you have an internet connection, courses on Udemy are available on any device at any time. If you don’t have an internet connection, some instructors also let their students download course lectures. That’s up to the instructor though, so make sure you get on their good side!

- Top 10 Mobile App Development Courses to Learn in December 2024
- Top 10 Graphic Design Courses to Learn in December 2024
- Top 10 Videography Courses to Learn in December 2024
- Top 10 Photography Courses to Learn in December 2024
- Top 10 Language Learning Courses to Learn in December 2024
- Top 10 Product Management Courses to Learn in December 2024
- Top 10 Investing Courses to Learn in December 2024
- Top 10 Personal Finance Courses to Learn in December 2024
- Top 10 Health And Wellness Courses to Learn in December 2024
- Top 10 Chatgpt And Ai Tools Courses to Learn in December 2024
- Top 10 Virtual Reality Courses to Learn in December 2024
- Top 10 Augmented Reality Courses to Learn in December 2024
- Top 10 Blockchain Development Courses to Learn in December 2024
- Top 10 Unity Game Development Courses to Learn in December 2024
- Top 10 Artificial Intelligence Courses to Learn in December 2024
- Top 10 Flutter Development Courses to Learn in December 2024
- Top 10 Docker Kubernetes Courses to Learn in December 2024
- Top 10 Business Analytics Courses to Learn in December 2024
- Top 10 Excel Vba Courses to Learn in December 2024
- Top 10 Devops Courses to Learn in December 2024