
Keying for modular 3d printable miniatures in zbrush
Keying for modular 3d printable miniatures in zbrush, available at $54.99, has an average rating of 4.3, with 17 lectures, based on 5 reviews, and has 41 subscribers.
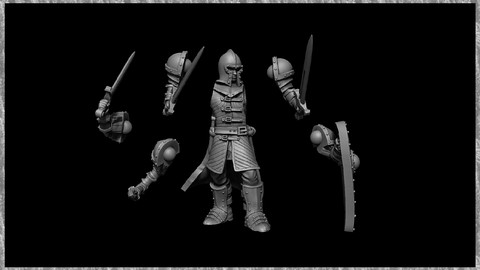
You will learn about Learn how to separate a solid (dynameshed) model into pieces. How to clean up a model that has been split into parts. How to create and add "keys and holes" into your pieces so that they fit ("slot") together when 3D printed. How to quickly create additional modular options that use the "keys and holes" that you've created.. How to check your pieces to make sure that they will work when printed, and how to edit your pieces when needed. This course is ideal for individuals who are This course is intended for sculptors who are looking to create variable modular options for their 3D printed models. or Unlike our other courses, this course is not intended for an absolute beginner. However, if you have taken any of our other courses you should have all of the knowledge you need to complete this course just fine. It is particularly useful for This course is intended for sculptors who are looking to create variable modular options for their 3D printed models. or Unlike our other courses, this course is not intended for an absolute beginner. However, if you have taken any of our other courses you should have all of the knowledge you need to complete this course just fine.
Enroll now: Keying for modular 3d printable miniatures in zbrush
Summary
Title: Keying for modular 3d printable miniatures in zbrush
Price: $54.99
Average Rating: 4.3
Number of Lectures: 17
Number of Published Lectures: 17
Number of Curriculum Items: 17
Number of Published Curriculum Objects: 17
Original Price: $19.99
Quality Status: approved
Status: Live
What You Will Learn
- Learn how to separate a solid (dynameshed) model into pieces.
- How to clean up a model that has been split into parts.
- How to create and add "keys and holes" into your pieces so that they fit ("slot") together when 3D printed.
- How to quickly create additional modular options that use the "keys and holes" that you've created..
- How to check your pieces to make sure that they will work when printed, and how to edit your pieces when needed.
Who Should Attend
- This course is intended for sculptors who are looking to create variable modular options for their 3D printed models.
- Unlike our other courses, this course is not intended for an absolute beginner. However, if you have taken any of our other courses you should have all of the knowledge you need to complete this course just fine.
Target Audiences
- This course is intended for sculptors who are looking to create variable modular options for their 3D printed models.
- Unlike our other courses, this course is not intended for an absolute beginner. However, if you have taken any of our other courses you should have all of the knowledge you need to complete this course just fine.
After many requests, we have created a step-by-step walkthrough course designed to teach the process of creating Modular 3D-printed Miniatures.
This course is divided into four stages:
-
The first section will teach you how to take an existing model and assess the best places to cut the model for keying. Josh then walks you through separating a solid (dynameshed) model to convert it into a modular one.
-
The second section will teach you how to clean up a separated model and best prepare it for keying. Josh also walks you through this process, pointing out all the pitfalls you may run into and how to avoid them to ensure the best outcome possible.
-
The third section covers keying itself. In this section, you will learn the best practices to create keys that work for 3D-printed miniatures and how to exaggerate features to plan for a margin of error.
-
In the final section, Josh walks you through copying and altering existing keyed pieces (created during the third section) to create multiple alternate modular pieces that can be used with your new modular model.
This course assumes that you have taken one of our previous courses and/or are already familiar with the basics of zbrush. Unlike our beginner courses, we do not take the time to explain how to install and navigate zbrush, explain commonly used brushes, etc. We also assume you know how to get a model from zbrush to a 3D printer. (this process is also covered in all of our previous courses)
We will provide the model that is used in the course. However, using a model of your own making is also recommended.
Unlike our previous courses, which focused on the students copying what Josh does during the video lessons, this course aims to teach the theory and practical application of creating keys and modular models. The goal of this course is to prepare you to apply our workflow in any of your own models while avoiding the pitfalls that we fell into as we discovered this process through trial and error.
Because of this, I strongly recommend watching each lesson without following along to absorb the concepts fully. Then, after you feel you understand the ideas being taught, go back and apply them to either your own models or the model we provide.
By the end of this course, you should have the knowledge and skill to create your own modular 3D printable miniatures with modular connections (keys) of professional quality. (this is the same workflow we use on the modular minis we sell.)
Course Curriculum
Chapter 1: Introduction
Lecture 1: Introduction
Chapter 2: Separating a solid (dynameshed) model into pieces.
Lecture 1: Tips before going in. PLEASE DO NOT SKIP THIS STEP!
Lecture 2: Download the files.
Lecture 3: Separating the model – stage 1
Lecture 4: Separating the model – stage 2
Lecture 5: Section Wrap-up and important tip!
Chapter 3: Clean Up
Lecture 1: Section Prep
Lecture 2: Cleaning up the Pieces – 1
Lecture 3: Cleaning up the Pieces – 2
Lecture 4: Section Wrap-up
Chapter 4: Keying
Lecture 1: Prepping the pieces for keying
Lecture 2: Keying
Lecture 3: A few points worth re-emphasizing
Chapter 5: Creating Additional Modular Pieces
Lecture 1: Spear Download
Lecture 2: Making Modular Pieces – part 1
Lecture 3: Making Modular Pieces – part 2
Lecture 4: Finishing Touches and Course Wrap-up
Instructors
-

Christian McNachtan
Founder & head of creative development at Runeforge Studios

Rating Distribution
- 1 stars: 0 votes
- 2 stars: 1 votes
- 3 stars: 0 votes
- 4 stars: 1 votes
- 5 stars: 3 votes
Frequently Asked Questions
How long do I have access to the course materials?
You can view and review the lecture materials indefinitely, like an on-demand channel.
Can I take my courses with me wherever I go?
Definitely! If you have an internet connection, courses on Udemy are available on any device at any time. If you don’t have an internet connection, some instructors also let their students download course lectures. That’s up to the instructor though, so make sure you get on their good side!

- Best Video Editing Courses to Learn in February 2025
- Best Music Production Courses to Learn in February 2025
- Best Animation Courses to Learn in February 2025
- Best Digital Illustration Courses to Learn in February 2025
- Best Renewable Energy Courses to Learn in February 2025
- Best Sustainable Living Courses to Learn in February 2025
- Best Ethical AI Courses to Learn in February 2025
- Best Cybersecurity Fundamentals Courses to Learn in February 2025
- Best Smart Home Technology Courses to Learn in February 2025
- Best Holistic Health Courses to Learn in February 2025
- Best Nutrition And Diet Planning Courses to Learn in February 2025
- Best Yoga Instruction Courses to Learn in February 2025
- Best Stress Management Courses to Learn in February 2025
- Best Mindfulness Meditation Courses to Learn in February 2025
- Best Life Coaching Courses to Learn in February 2025
- Best Career Development Courses to Learn in February 2025
- Best Relationship Building Courses to Learn in February 2025
- Best Parenting Skills Courses to Learn in February 2025
- Best Home Improvement Courses to Learn in February 2025
- Best Gardening Courses to Learn in February 2025