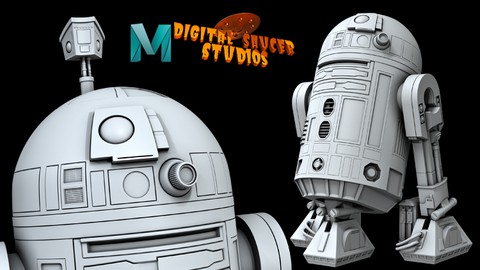
Master Hard Surface Modeling in Maya 2020
Master Hard Surface Modeling in Maya 2020, available at $49.99, has an average rating of 4.25, with 145 lectures, based on 68 reviews, and has 9606 subscribers.
You will learn about How to use Maya. How to learn Maya's modeling tools. How to master professional modeling techniques. This course is ideal for individuals who are Students who want to become industry professionals in the film, game, and entertainment business. It is particularly useful for Students who want to become industry professionals in the film, game, and entertainment business.
Enroll now: Master Hard Surface Modeling in Maya 2020
Summary
Title: Master Hard Surface Modeling in Maya 2020
Price: $49.99
Average Rating: 4.25
Number of Lectures: 145
Number of Published Lectures: 145
Number of Curriculum Items: 145
Number of Published Curriculum Objects: 145
Original Price: $22.99
Quality Status: approved
Status: Live
What You Will Learn
- How to use Maya.
- How to learn Maya's modeling tools.
- How to master professional modeling techniques.
Who Should Attend
- Students who want to become industry professionals in the film, game, and entertainment business.
Target Audiences
- Students who want to become industry professionals in the film, game, and entertainment business.
This course is an epic 36 hours long!
You will learn how to master hard surface modeling in Maya.
You will begin by understanding the basic concepts of modeling in Maya.
You will learn Maya’s powerful modeling tools.
You will learn where the tools are located, how to use the tools, why to use the tools and when to use the tools.
You will learn the tool options, the shortcuts, and the best and most efficient way to use the tools.
Tools you will learn include:
-
Bevel Tool
-
Insert Edge Loop Tool
-
Multi-Cut Tool
-
Mirror Tool
-
Bridge Tool
-
Extrude Tool
-
Boolean Tool
-
Slide Edge Tool
-
Edit Edge Flow Tool
-
Combine/Separate/Extract/Duplicate
And many, many more tools.
You will learn professional tips and tricks that will make you a better modeler.
You will learn the difference between bad and good geometry, how to fix bad geometry, what mistakes to avoid and how to fix common problems.
This course is project-based so you will dive into the modeling process by creating R2-D2, the famous robot from Star Wars.
First, you will learn how to block out R2-D2 from using image planes.
You will learn how to create simple primitive polygons to block out the shape and form.
You will learn how to detail the shapes and how to create supporting edges and where to place resolution in order to create the model you want to make.
You will learn that you are in control of the modeling process and that there is nothing to fear from the modeling process.
My techniques are designed for you to learn at your own pace as I go through every step from start to finish.
You will learn how to create R2-D2’s dome head, all the panels and buttons.
You will learn how to create all the panels and buttons on the body, and finally all the details on the legs.
You will learn some simple rigging techniques that will allow you to control some of R2-D2s tools, like the periscope that comes out of his head, and also a panel that slides open to reveal Luke Skywalker’s Lightsaber.
You will learn how to animate the periscope so it will look like R2-D2 is looking around.
You will learn how to animate the sliding panel so the Lightsaber can shoot out, just like in Return of the Jedi when R2-D2 threw the Lightsaber at Luke.
Finally, you will learn how to present R2-D2 as if you were showing the model to an employer, like a movie studio or a game company.
You will learn how to use lighting techniques and render R2-D2 to create a brilliant finished piece to show to professionals and/or to put on social media.
This course is in-depth with tons of tips, tricks and techniques that will give you the confidence you need to begin creating your own 3D models in Maya.
Course Curriculum
Chapter 1: Introduction
Lecture 1: Introduction
Chapter 2: Modeling the Robot Character R2-D2
Lecture 1: Setting Up a New Project
Lecture 2: Quick Tour of the Interface
Lecture 3: Setting Up the Image Planes
Lecture 4: Resizing the Image Planes
Lecture 5: Blocking Out the Head and Body
Lecture 6: Blocking Out the Leg
Lecture 7: Blocking Out the Head Details Part 1
Lecture 8: Blocking Out the Head Details Part 2
Lecture 9: Blocking Out the Front Eye
Lecture 10: Blocking Out the Head Details Part 3
Lecture 11: Blocking Out Head Details Part 4
Lecture 12: Blocking Out the Head Details Part 5
Lecture 13: Blocking Out the Head Details Part 6
Lecture 14: Blocking Out the Head Details Part 7
Lecture 15: Blocking Out the Body Details Part 1
Lecture 16: Blocking Out the Body Details Part 2
Lecture 17: Blocking Out the Body Details Part 3
Lecture 18: Blocking Out the Body Details Part 4
Lecture 19: Blocking Out the Body Details Part 5
Lecture 20: Blocking Out the Body Details Part 6
Lecture 21: Blocking Out the Body Details Part 7
Lecture 22: Blocking Out the Body Details Part 8
Lecture 23: Blocking Out the Bottom
Lecture 24: Blocking Out the Feet Part 1
Lecture 25: Blocking Out the Feet Part 2
Lecture 26: Blocking Out the Feet Part 3
Lecture 27: Blocking Out the Feet Part 4
Lecture 28: Blocking Out the Foot Part 5
Lecture 29: Adding Details to the Head Part 1
Lecture 30: Adding Details to the Head Part 2
Lecture 31: Finishing the Pie Panels
Lecture 32: Creating the Periscope Part 1
Lecture 33: Creating the Periscope Part 2
Lecture 34: Creating the Periscope Part 3
Lecture 35: Creating the Periscope Part 4
Lecture 36: Blocking Out the Lightsaber
Lecture 37: Finishing the Lightsaber
Lecture 38: Creating the Top Holoprojector
Lecture 39: Creating the Radar Eye Part 1
Lecture 40: Creating the Radar Eye Part 2
Lecture 41: Finishing the Dome Panels Part 1
Lecture 42: Finishing the Dome Panels Part 2
Lecture 43: Finishing the Dome Panels Part 3
Lecture 44: Creating the Back Holoprojector
Lecture 45: Finishing the Dome Panels Part 4
Lecture 46: Finishing the Dome Panels Part 5
Lecture 47: Creating the Processor State Indicator
Lecture 48: Finishing the Dome Panels Part 6
Lecture 49: Finishing the Front Holoprojector
Lecture 50: Creating the Large Data Port
Lecture 51: Creating the Utility Arms
Lecture 52: Creating the Body Panels Part 1
Lecture 53: Creating the Body Panels Part 2
Lecture 54: Creating the Body Panels Part 3
Lecture 55: Creating the Body Panels Part 4
Lecture 56: Creating the Coin Slots
Lecture 57: Creating the Front Vents
Lecture 58: Making Changes to Some of the Panels
Lecture 59: Creating the Coin Return
Lecture 60: Creating the Polarity Sink Part 1
Lecture 61: Creating the Polarity Sink Part 2
Lecture 62: Creating the Power Coupler
Lecture 63: Creating the Octagon Port Part 1
Lecture 64: Creating the Octagon Port Part 2
Lecture 65: Creating the Side Panels
Lecture 66: Cleaning Up the Geometry
Lecture 67: Finishing the Back Panels Part 1
Lecture 68: Finishing the Back Panels Part 2
Lecture 69: Finishing the Back Panels Part 3
Lecture 70: Finishing the Back Panels Part 4
Lecture 71: Finishing the Back Panels Part 5
Lecture 72: Finishing the Back Panels Part 6
Lecture 73: Finishing the Back Panels Part 7
Lecture 74: Finishing the Legs Part 1
Lecture 75: Finishing the Legs Part 2
Lecture 76: Finishing the Legs Part 3
Lecture 77: Finishing the Legs Part 4
Lecture 78: Finishing the Legs Part 5
Lecture 79: Finishing the Legs Part 6
Lecture 80: Finishing the Legs Part 7
Lecture 81: Finishing the Legs Part 8
Lecture 82: Finishing the Legs Part 9
Lecture 83: Finishing the Legs Part 10
Lecture 84: Finishing the Legs Part 11
Lecture 85: Finishing the Legs Part 12
Lecture 86: Finishing the Legs Part 13
Lecture 87: Finishing the Legs Part 14
Lecture 88: Finishing the Legs Part 15
Lecture 89: Finishing the Legs Part 16
Lecture 90: Finishing the Legs Part 17
Lecture 91: Finishing the Legs Part 18
Lecture 92: Finishing the Legs Part 19
Lecture 93: Finishing the Legs Part 20
Lecture 94: Finishing the Legs Part 21
Lecture 95: Finishing the Legs Part 22
Lecture 96: Finishing the Legs Part 23
Lecture 97: Finishing the Legs Part 24
Instructors
-
Digital Saucer Studios
Become a Great Digital Artist
Rating Distribution
- 1 stars: 2 votes
- 2 stars: 0 votes
- 3 stars: 12 votes
- 4 stars: 18 votes
- 5 stars: 36 votes
Frequently Asked Questions
How long do I have access to the course materials?
You can view and review the lecture materials indefinitely, like an on-demand channel.
Can I take my courses with me wherever I go?
Definitely! If you have an internet connection, courses on Udemy are available on any device at any time. If you don’t have an internet connection, some instructors also let their students download course lectures. That’s up to the instructor though, so make sure you get on their good side!
You may also like
- Top 10 Video Editing Courses to Learn in November 2024
- Top 10 Music Production Courses to Learn in November 2024
- Top 10 Animation Courses to Learn in November 2024
- Top 10 Digital Illustration Courses to Learn in November 2024
- Top 10 Renewable Energy Courses to Learn in November 2024
- Top 10 Sustainable Living Courses to Learn in November 2024
- Top 10 Ethical AI Courses to Learn in November 2024
- Top 10 Cybersecurity Fundamentals Courses to Learn in November 2024
- Top 10 Smart Home Technology Courses to Learn in November 2024
- Top 10 Holistic Health Courses to Learn in November 2024
- Top 10 Nutrition And Diet Planning Courses to Learn in November 2024
- Top 10 Yoga Instruction Courses to Learn in November 2024
- Top 10 Stress Management Courses to Learn in November 2024
- Top 10 Mindfulness Meditation Courses to Learn in November 2024
- Top 10 Life Coaching Courses to Learn in November 2024
- Top 10 Career Development Courses to Learn in November 2024
- Top 10 Relationship Building Courses to Learn in November 2024
- Top 10 Parenting Skills Courses to Learn in November 2024
- Top 10 Home Improvement Courses to Learn in November 2024
- Top 10 Gardening Courses to Learn in November 2024


