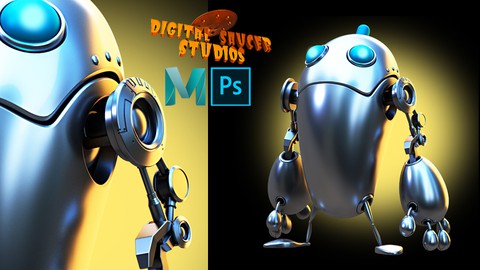
Modeling and Rendering a Robot in Maya 2020
Modeling and Rendering a Robot in Maya 2020, available at $29.99, has an average rating of 4.15, with 55 lectures, based on 15 reviews, and has 6974 subscribers.
You will learn about How to use Maya. How to learn Maya's modeling tools. How to master professional modeling techniques. How to use lighting and rendering techniques using Arnold in Maya. How to use finishing techniques in Photoshop. This course is ideal for individuals who are Students who want to become industry professionals in the film, game, and entertainment business. It is particularly useful for Students who want to become industry professionals in the film, game, and entertainment business.
Enroll now: Modeling and Rendering a Robot in Maya 2020
Summary
Title: Modeling and Rendering a Robot in Maya 2020
Price: $29.99
Average Rating: 4.15
Number of Lectures: 55
Number of Published Lectures: 55
Number of Curriculum Items: 55
Number of Published Curriculum Objects: 55
Original Price: $22.99
Quality Status: approved
Status: Live
What You Will Learn
- How to use Maya.
- How to learn Maya's modeling tools.
- How to master professional modeling techniques.
- How to use lighting and rendering techniques using Arnold in Maya.
- How to use finishing techniques in Photoshop.
Who Should Attend
- Students who want to become industry professionals in the film, game, and entertainment business.
Target Audiences
- Students who want to become industry professionals in the film, game, and entertainment business.
In this course you will lean how to create a robot character in Autodesk Maya.
Firstly, you will learn how to block out the character using a simple sphere.
Then you will learn how to use the QUAD DRAW TOOL. This tool is very powerful and it allows you to create polygons with a click of the mouse. This tool enables you to create any shape you like. It allows you to add more polygons, delete polygons, and add extra EDGE LOOPS. there is also a RELAX function that allows to space the polygons evenly, giving you a great looking model.
You will also learn how to create a DISPLACEMENT MAP. This map allows you to add extra details to the model without doing any extra modeling. The process is simple. Firstly, you will learn how to create UVs using the UV editor, then save the UV map to take into Photoshop.
In photoshop you will learn how to make the displacement map, then you will learn how to plug the map into the model for the final render.
Next, you will earn how to set up the lighting in Maya. You will learn how to use the SKYDOME light, and how to use a HDRI map, which is a high resolution texture map that acts as a light source.
Then you will learn how to create extra lights to create a more interesting lighting scenario, making your character look more cinematic and stylish.
Finally, you will learn how to set up the Arnold render so you can create beautifully rendered images.
Then afterwards, you will learn how to composite the image in Photoshop, and how to add extra details, like extra lights for the character’s eyes and a background that matches the lighting on the model.
This course teaches you all the principles of modeling, how to light efficiently, and how to use Maya effectively for your future modeling and lighting projects.
Course Curriculum
Chapter 1: Introduction
Lecture 1: Introduction
Lecture 2: 002. Blocking Out the Body
Lecture 3: 003. Blocking Out the Eyes
Lecture 4: 004. Creating the Head Light
Lecture 5: 005. Blocking Out the Shoulder & Resizing the Body
Lecture 6: 006. Blocking Out the Hip
Lecture 7: 007. Creating the Mouth with CV Curve Tool
Lecture 8: 008. Creating the Head with Quad Draw
Lecture 9: 009. Creating the Body with Quad Draw
Lecture 10: 010. Reshaping the Body with Sculpt Tool
Lecture 11: 011. Finishing the Eyes
Lecture 12: 012. Finishing the Head
Lecture 13: 013. Finishing the Body
Lecture 14: 014. Adding Bolts to the Head
Lecture 15: 015. Creating the Shoulder Part 1
Lecture 16: 016. Creating the Shoulder Part 2
Lecture 17: 017. Creating the Shoulder Part 3
Lecture 18: 018. Creating the Arm Part 1
Lecture 19: 019. Creating the Arm Part 2
Lecture 20: 020. Creating the Arm Part 3
Lecture 21: 021. Creating the Arm Part 4
Lecture 22: 022. Creating the Arm Part 5
Lecture 23: 023. Creating the Arm Part 6
Lecture 24: 024. Creating the Arm Part 7
Lecture 25: 025. Creating the Arm Part 8
Lecture 26: 026. Creating the Arm Part 9
Lecture 27: 027. Creating the Arm Part 10
Lecture 28: 028. Creating the Hand Part 1
Lecture 29: 029. Creating the Hand with Quad Draw
Lecture 30: 030. Finishing the Hand Part 1
Lecture 31: 031. Finishing the Hand Part 2
Lecture 32: 032. Finishing the Fingers Part 1
Lecture 33: 033. Finishing the Fingers Part 2
Lecture 34: 034. Matching Transformations with the Fingers
Lecture 35: 035. Grouping the Arms
Lecture 36: 036. Finishing the Legs
Lecture 37: 037. Finishing the Feet
Lecture 38: 038. Grouping the Character
Lecture 39: 039. Creating UVs
Lecture 40: 040. Creating a Displacement Map in Photoshop
Lecture 41: 041. Deleting Unwanted Faces
Lecture 42: 042. Rendering the Displacement Map
Lecture 43: 043. Creating a Camera
Lecture 44: 044. Render Settings
Lecture 45: 045. Understanding Focal Length
Lecture 46: 046. Smoothing the Model
Lecture 47: 047. Assigning Materials to the Model
Lecture 48: 048. Lighting with the Skydome
Lecture 49: 049. Adding Ambient Occlusion
Lecture 50: 050. Creating a Metallic Surface
Lecture 51: 051. Creating Material for the Eyes
Lecture 52: 052. Creating Front and Back Lighting
Lecture 53: 053. Setting Up the Final Render
Lecture 54: 054. Final Touches in Photoshop Part 1
Lecture 55: 055. Final Touches in Photoshop Part 2
Instructors
-
Digital Saucer Studios
Become a Great Digital Artist
Rating Distribution
- 1 stars: 0 votes
- 2 stars: 0 votes
- 3 stars: 2 votes
- 4 stars: 7 votes
- 5 stars: 6 votes
Frequently Asked Questions
How long do I have access to the course materials?
You can view and review the lecture materials indefinitely, like an on-demand channel.
Can I take my courses with me wherever I go?
Definitely! If you have an internet connection, courses on Udemy are available on any device at any time. If you don’t have an internet connection, some instructors also let their students download course lectures. That’s up to the instructor though, so make sure you get on their good side!
You may also like
- Top 10 Language Learning Courses to Learn in November 2024
- Top 10 Video Editing Courses to Learn in November 2024
- Top 10 Music Production Courses to Learn in November 2024
- Top 10 Animation Courses to Learn in November 2024
- Top 10 Digital Illustration Courses to Learn in November 2024
- Top 10 Renewable Energy Courses to Learn in November 2024
- Top 10 Sustainable Living Courses to Learn in November 2024
- Top 10 Ethical AI Courses to Learn in November 2024
- Top 10 Cybersecurity Fundamentals Courses to Learn in November 2024
- Top 10 Smart Home Technology Courses to Learn in November 2024
- Top 10 Holistic Health Courses to Learn in November 2024
- Top 10 Nutrition And Diet Planning Courses to Learn in November 2024
- Top 10 Yoga Instruction Courses to Learn in November 2024
- Top 10 Stress Management Courses to Learn in November 2024
- Top 10 Mindfulness Meditation Courses to Learn in November 2024
- Top 10 Life Coaching Courses to Learn in November 2024
- Top 10 Career Development Courses to Learn in November 2024
- Top 10 Relationship Building Courses to Learn in November 2024
- Top 10 Parenting Skills Courses to Learn in November 2024
- Top 10 Home Improvement Courses to Learn in November 2024


