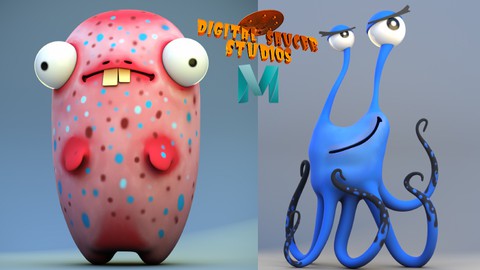
Modeling and Rendering Cute Characters in Maya 2020
Modeling and Rendering Cute Characters in Maya 2020, available at $39.99, has an average rating of 4.5, with 72 lectures, based on 22 reviews, and has 9289 subscribers.
You will learn about Understand Maya's most commonly used modelling tools. Know how to use the modelling tools in various ways. Understand and master topology. What makes good topology? And how to fix bad topology. Learn how to present your models for rendering. Learn how to paint and texture your models using Maya's 3D painting brush. This course is ideal for individuals who are Students who wish to learn Maya with a focus on creating characters. It is particularly useful for Students who wish to learn Maya with a focus on creating characters.
Enroll now: Modeling and Rendering Cute Characters in Maya 2020
Summary
Title: Modeling and Rendering Cute Characters in Maya 2020
Price: $39.99
Average Rating: 4.5
Number of Lectures: 72
Number of Published Lectures: 72
Number of Curriculum Items: 72
Number of Published Curriculum Objects: 72
Original Price: $22.99
Quality Status: approved
Status: Live
What You Will Learn
- Understand Maya's most commonly used modelling tools.
- Know how to use the modelling tools in various ways.
- Understand and master topology. What makes good topology? And how to fix bad topology.
- Learn how to present your models for rendering.
- Learn how to paint and texture your models using Maya's 3D painting brush.
Who Should Attend
- Students who wish to learn Maya with a focus on creating characters.
Target Audiences
- Students who wish to learn Maya with a focus on creating characters.
Modeling and Rendering Cute Characters in Maya 2020
In this tutorial, I will show you how to create TWO FUN, CUTE, CARTOON CHARACTERS in Maya 2020.
But first I begin by showing you some of the basic tools in Maya, like how to navigate the camera, how to set up your viewport in preparation to do some modeling, and how to use some of Maya’s most common modelling tools, like the:
-
EXTRUDE TOOL
-
MULTI-CUT TOOL
-
MIRROR TOOL
-
BEVEL TOOL
Then we move on to do some modeling.
Firstly, we block out the character shapes, then complete the process by adding details and learning how to use correct geometry so your models look clean and professional.
The next step is to use the UV Editor to create nice, clean UV maps for the characters. Having great UVs are important for when it comes to texturing.
I will show you how to texture in Maya using a variety of ways, mainly using various nodes inside the HYPERSHADE, and using the 3D Paint Tool.
Finally, I will show you how to set up the lighting, and how to create nice, clean, gorgeous renders of your models.
You will find this tutorial very informative, and packed with professional tips and tricks that will allow you to create your own characters in Maya.
Course Curriculum
Chapter 1: Introduction
Lecture 1: Introduction
Lecture 2: 002. Navigating the Camera
Lecture 3: 003. Selection Tools
Lecture 4: 004. Heads Up Display
Lecture 5: 005. Custom Shelf
Lecture 6: 006. Extrude Tool
Lecture 7: 007. Multi-Cut Tool
Lecture 8: 008. Bevel Tool and Mirror Tool
Chapter 2: CHARACTER 1
Lecture 1: 01. Blocking Out the Body
Lecture 2: 02. Creating the Eyeballs
Lecture 3: 03. Projecting Curves for Nostril and Mouth
Lecture 4: 04. Creating the Hand
Lecture 5: 05. Creating the Leg and Halfing the Model
Lecture 6: 06. Quad Draw Tool to Create Topology
Lecture 7: 07. Relaxing Topology with Quad Draw
Lecture 8: 08. Finishing the Nostril
Lecture 9: 09. Finishing the Mouth
Lecture 10: 10. Finishing the Eye
Lecture 11: 11. Attaching the Hand
Lecture 12: 12. Creating the Feet
Lecture 13: 13. Finishing the Feet and Mirroring the Body
Lecture 14: 14. Creating the Teeth and Fixing the Nostrils
Lecture 15: 15. Fixing the Geometry
Lecture 16: 16. Fixing the Geometry and Finishing the Mouth
Lecture 17: 17. Setting Up the Camera and Background
Lecture 18: 18. UV Mapping the Left Eye
Lecture 19: 19. UV Mapping the Right Eye
Lecture 20: 20. UV Mapping the Teeth
Lecture 21: 21. UV Mapping the Hands, Mouth and Nostrils
Lecture 22: 22. UV Mapping the Body
Lecture 23: 23. Creating the Skydome Light
Lecture 24: 24. Creating the Arnold Materials
Lecture 25: 25. Adding Ambient Occlusion
Lecture 26: 26. Texturing the Eyes
Lecture 27: 27. Texturing the Teeth
Lecture 28: 28. Texturing the Body
Lecture 29: 29. Applying the Body Texture to Arnold Material
Lecture 30: 30. Creating Area Lights
Lecture 31: 31. Creating the Final Render
Chapter 3: CHARACTER 2
Lecture 1: 001. Setting Up the Image Plane
Lecture 2: 002. Creating the Eyes
Lecture 3: 003. Blocking Out the Eyelids
Lecture 4: 004. Finishing the Eyelids
Lecture 5: 005. Blocking Out the Stalks
Lecture 6: 006. Finishing the Stalks
Lecture 7: 007. Blocking Out the Body
Lecture 8: 008. Projecting Mouth Curve onto Geometry
Lecture 9: 009. Creating the Curves for the Tentacles
Lecture 10: 010. Creating Tentacle 1
Lecture 11: 011. Creating Tentacle 2
Lecture 12: 012. Creating Tentacle 3
Lecture 13: 013. Creating Tentacle 4
Lecture 14: 014. Creating Tentacle 5
Lecture 15: 015. Posing the Tentacles
Lecture 16: 016. Using Quad Draw Part 1
Lecture 17: 017. Using Quad Draw Part 2
Lecture 18: 018. Attaching the Stalks
Lecture 19: 019. Attaching the Tentacles Part 1
Lecture 20: 020. Attaching the Tentacles Part 2
Lecture 21: 021. Attaching the Tentacles Part 3
Lecture 22: 022. Finishing the Mouth and the Body
Lecture 23: 023. Creating the Eyelashes
Lecture 24: 024. UV Maaping Part 1
Lecture 25: 025. UV Mapping Part 2
Lecture 26: 026. UV Mapping Part 2
Lecture 27: 027. Setting Up the Camera
Lecture 28: 028. Creating the Skydome Light
Lecture 29: 029. Texturing the Background and Eyelashes
Lecture 30: 030. Texturing the Eyeballs
Lecture 31: 031. Using 3D Paint Tool to Texture the Character
Lecture 32: 032. Finishing the Texturing Process
Lecture 33: 033. Creating Area Lights and Final Render
Instructors
-
Digital Saucer Studios
Become a Great Digital Artist
Rating Distribution
- 1 stars: 0 votes
- 2 stars: 0 votes
- 3 stars: 3 votes
- 4 stars: 5 votes
- 5 stars: 14 votes
Frequently Asked Questions
How long do I have access to the course materials?
You can view and review the lecture materials indefinitely, like an on-demand channel.
Can I take my courses with me wherever I go?
Definitely! If you have an internet connection, courses on Udemy are available on any device at any time. If you don’t have an internet connection, some instructors also let their students download course lectures. That’s up to the instructor though, so make sure you get on their good side!
You may also like
- Top 10 Language Learning Courses to Learn in November 2024
- Top 10 Video Editing Courses to Learn in November 2024
- Top 10 Music Production Courses to Learn in November 2024
- Top 10 Animation Courses to Learn in November 2024
- Top 10 Digital Illustration Courses to Learn in November 2024
- Top 10 Renewable Energy Courses to Learn in November 2024
- Top 10 Sustainable Living Courses to Learn in November 2024
- Top 10 Ethical AI Courses to Learn in November 2024
- Top 10 Cybersecurity Fundamentals Courses to Learn in November 2024
- Top 10 Smart Home Technology Courses to Learn in November 2024
- Top 10 Holistic Health Courses to Learn in November 2024
- Top 10 Nutrition And Diet Planning Courses to Learn in November 2024
- Top 10 Yoga Instruction Courses to Learn in November 2024
- Top 10 Stress Management Courses to Learn in November 2024
- Top 10 Mindfulness Meditation Courses to Learn in November 2024
- Top 10 Life Coaching Courses to Learn in November 2024
- Top 10 Career Development Courses to Learn in November 2024
- Top 10 Relationship Building Courses to Learn in November 2024
- Top 10 Parenting Skills Courses to Learn in November 2024
- Top 10 Home Improvement Courses to Learn in November 2024


