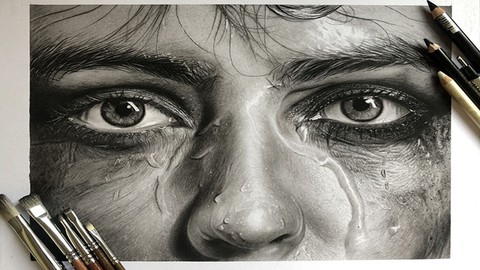
Realistic Pencil Drawing: How to Drawing a Wet Portrait
Realistic Pencil Drawing: How to Drawing a Wet Portrait, available at $64.99, has an average rating of 4.3, with 62 lectures, based on 37 reviews, and has 422 subscribers.
You will learn about Learning how to draw skin textures, wetness on the face, creating water drops The student will become very familiar with how to create eyes, nose, and face volume in the chiaroscuro technique The student should be able to perform a textured and wet face with the chiaroscuro technique This course is ideal for individuals who are This course is suitable for students who have passed the beginner course of chiaroscuro or have a background in other painting techniques or This course is at a level that is suitable for students over 13 years old who can have a correct understanding of volume and texture or All students who are relatively familiar with drawing or who have already taken our sketching course can use the training in this course and be able to improve their artistic level by using more advanced levels of charcoal drawing course. It is particularly useful for This course is suitable for students who have passed the beginner course of chiaroscuro or have a background in other painting techniques or This course is at a level that is suitable for students over 13 years old who can have a correct understanding of volume and texture or All students who are relatively familiar with drawing or who have already taken our sketching course can use the training in this course and be able to improve their artistic level by using more advanced levels of charcoal drawing course.
Enroll now: Realistic Pencil Drawing: How to Drawing a Wet Portrait
Summary
Title: Realistic Pencil Drawing: How to Drawing a Wet Portrait
Price: $64.99
Average Rating: 4.3
Number of Lectures: 62
Number of Published Lectures: 62
Number of Curriculum Items: 62
Number of Published Curriculum Objects: 62
Original Price: $199.99
Quality Status: approved
Status: Live
What You Will Learn
- Learning how to draw skin textures, wetness on the face, creating water drops
- The student will become very familiar with how to create eyes, nose, and face volume in the chiaroscuro technique
- The student should be able to perform a textured and wet face with the chiaroscuro technique
Who Should Attend
- This course is suitable for students who have passed the beginner course of chiaroscuro or have a background in other painting techniques
- This course is at a level that is suitable for students over 13 years old who can have a correct understanding of volume and texture
- All students who are relatively familiar with drawing or who have already taken our sketching course can use the training in this course and be able to improve their artistic level by using more advanced levels of charcoal drawing course.
Target Audiences
- This course is suitable for students who have passed the beginner course of chiaroscuro or have a background in other painting techniques
- This course is at a level that is suitable for students over 13 years old who can have a correct understanding of volume and texture
- All students who are relatively familiar with drawing or who have already taken our sketching course can use the training in this course and be able to improve their artistic level by using more advanced levels of charcoal drawing course.
In this course, you’ll learn how to draw realistic portrait with Conte and charcoal pencil from the ground up. The course is supported with over 11 hours of clear content that I walk you through each step of the way.
Here’s what you get with the course:
– To create the model taught in this course, familiarity with the design principles and the basic steps of the chiaroscuro will definitely be useful.
– This training consists of about 11 hours of the instructional video, including each step, which is the minimum time that the student must spend to achieve the desired result in creating the volume of the face and wet skin texture.
– The following training course has been prepared with the aim of teaching how to draw skin textures, wetness on the face, creating water drops. In addition, the student will become very familiar with how to create eyes, nose, and face volume in the chiaroscuro technique.
– In this course, we will teach you how to create eyes, eyebrows, nose, skin textures, wet textures on the skin, and water droplets using Conte pencils, charcoal powder, and a variety of brushes and erasers.
– Students are taught how to create volume first and then model textures and water droplets on the work.
– The student also gets acquainted with the use of different types of erasers in chiaroscuro and how to use them.
– At the end of this course, the student should be able to perform a textured and wet face with the chiaroscuro technique.
What else will you get?
– Personal contact with me, the course tutor
– Lifetime access to course materials
– Understanding of how professional art is created
– This all comes under one convenient easy to use platform. Plus you will get fast, friendly, responsive support on the Udemy Q&A section of the course or direct message.
I will be here for you every step of the way!
So what are you waiting for? Sign up now and change your art world today!
Course Curriculum
Chapter 1: Introduction
Lecture 1: Introduction
Lecture 2: Main Picture
Chapter 2: Sketching the right eye
Lecture 1: Drawing the right eye with a pencil
Lecture 2: Completing the iris of the right eye
Lecture 3: Shading the eye with brush and charcoal
Chapter 3: A foundation for eye's textures
Lecture 1: Creating a dark volume under the right eyelid
Lecture 2: Continue subcutaneous texture of the right eye
Chapter 4: Creating volume for the right side of the face
Lecture 1: Creating the volume of right side of the face
Chapter 5: Foundation of the eyebrow
Lecture 1: Subcutaneous of eyebrow
Chapter 6: Volume and textures for the right side of the face
Lecture 1: Completing the right eyebrow and creating the right volume of the forehead and u
Lecture 2: Creating a shiny texture on the eyelid
Lecture 3: Creating light inside the right eye and around the eye
Lecture 4: Creating shiny texture right side of forehead
Lecture 5: Drawing the inner corner texture of the right eye
Lecture 6: Drawing drop of water and completing the texture of the inner corner of the righ
Lecture 7: Start creating the linear texture under the right eye
Lecture 8: Creating fine lines under the right eye
Lecture 9: Creating volume and exposure to the eye texture in the lower right eye
Lecture 10: Learn to create fine linear textures under the eyes and drawing the right eyela
Lecture 11: Completing eyelashes and fine textures of the right eye
Chapter 7: Creating the water droplets and water texture
Lecture 1: Completing the texture created in the previous step by adding darkness
Lecture 2: Creating the subcutaneous of drops of running water on the right side of the fac
Lecture 3: Completing running water drops and water gender
Chapter 8: Completing the textures of the right side of the face and cheek
Lecture 1: Learn how to make a paper funnel and use it to create textures
Lecture 2: Continue creating the right cheek and lip texture
Lecture 3: Completing light and dark textures of cheek
Lecture 4: Creating the texture of the inner part of the right cheek with the eraser
Lecture 5: Continue to create the texture of the inner part of the right cheek with an el
Lecture 6: Lightening of right cheek texture
Chapter 9: Creating the volume and the texture of the nose
Lecture 1: Drawing the darkness of the tip of the nose with a charcoal pencil
Lecture 2: Shading and shaping the volume of the tip of the nose
Lecture 3: Shading subcutaneous of the nose blade volume
Lecture 4: Completing the darkness of the nose volume with charcoal and a brush
Lecture 5: Creating light to create nasal textures
Lecture 6: Creating intense light and subcutaneous of the drops on the nose
Lecture 7: Work with an fader to shape water droplets on the nose
Lecture 8: Completing the texture and drops on the nose
Chapter 10: Sketching the left eye
Lecture 1: Drawing the left iris with pencil
Lecture 2: Continue the left eye with a pencil
Lecture 3: Completing the iris of the left eye
Lecture 4: Completing the left eyelid
Chapter 11: Creating the left eyebrow, creating the volume of the eyelid and the forehead
Lecture 1: Create volume behind the eyelid and start drawing eyebrow hair
Lecture 2: Drawing the left eyebrow
Lecture 3: Drawing the left side of forehead
Lecture 4: Create a dark texture behind the left eyelid with a pencil
Lecture 5: Erasing the texture behind the eyelids and drawing the eyebrow hairs
Lecture 6: Completing the left eyebrow
Chapter 12: Creating wet hair on the forehead
Lecture 1: Completing the darkness of the forehead and draw the hair with a pencil
Lecture 2: Completing the wet hair on the forehead
Chapter 13: Creating the volume for the left side of the face
Lecture 1: Creating lower subcutaneous of left eye
Lecture 2: Volume the left side of the face
Chapter 14: Creating the skin texture on the forehead
Lecture 1: Creating skin lights on the forehead
Chapter 15: Completing the eyelashes and the foundation for water droplets on the left side
Lecture 1: Completing eyelashes and whiteness of the left eye
Lecture 2: The textures under the eyes and subcutaneous of the water droplets on the left s
Chapter 16: Completing the textures of the nose
Lecture 1: Completing the texture and darkness of the blade of the nose
Lecture 2: Final completion of nose texture
Chapter 17: Creating the textures for the left cheek
Lecture 1: Creating texture next to the nose on the left side of the face
Lecture 2: Create left cheek texture with eraser
Lecture 3: Continue to create textures on the left side of the face with a brush eraser an
Lecture 4: Completing the darkness and lightness of textures on the left side of face
Chapter 18: Completing the lights using different erasers and the white pen
Lecture 1: Completing the lights using a variety of erasers and white pens
Chapter 19: Final explanations and finishing the work
Lecture 1: Final explanations and completion of work
Instructors
-
Homa Tayefeh
Colored Pencil and Ballpoint Pen Drawing Artist -
Matin Shafiei
Colored Pencil and Ballpoint Pen Drawing Artist -
Milad Ahmadi
Professional Programmer
Rating Distribution
- 1 stars: 2 votes
- 2 stars: 0 votes
- 3 stars: 3 votes
- 4 stars: 10 votes
- 5 stars: 22 votes
Frequently Asked Questions
How long do I have access to the course materials?
You can view and review the lecture materials indefinitely, like an on-demand channel.
Can I take my courses with me wherever I go?
Definitely! If you have an internet connection, courses on Udemy are available on any device at any time. If you don’t have an internet connection, some instructors also let their students download course lectures. That’s up to the instructor though, so make sure you get on their good side!
You may also like
- Best Parenting Skills Courses to Learn in March 2025
- Best Home Improvement Courses to Learn in March 2025
- Best Gardening Courses to Learn in March 2025
- Best Sewing And Knitting Courses to Learn in March 2025
- Best Interior Design Courses to Learn in March 2025
- Best Writing Courses Courses to Learn in March 2025
- Best Storytelling Courses to Learn in March 2025
- Best Creativity Workshops Courses to Learn in March 2025
- Best Resilience Training Courses to Learn in March 2025
- Best Emotional Intelligence Courses to Learn in March 2025
- Best Time Management Courses to Learn in March 2025
- Best Remote Work Strategies Courses to Learn in March 2025
- Best Freelancing Courses to Learn in March 2025
- Best E-commerce Strategies Courses to Learn in March 2025
- Best Personal Branding Courses to Learn in March 2025
- Best Stock Market Trading Courses to Learn in March 2025
- Best Real Estate Investing Courses to Learn in March 2025
- Best Financial Technology Courses to Learn in March 2025
- Best Agile Methodologies Courses to Learn in March 2025
- Best Project Management Courses to Learn in March 2025


